In Mrs. Dunlap's drafting class, we are learning how to make lines that become drawings. Drafting drawings are used when things are built. and it is very specific. Some drawings that we learn to draw are technical drawings, 3-view drawings, etc. There are also many tricks that help finish our drawings more efficiently and faster. We also create drawings on CAD (Computer-aided Design). As the year goes on, the drawings become more challenging, but it's fun challenging yourself.
Cell Phone Holder Design

Click for larger image
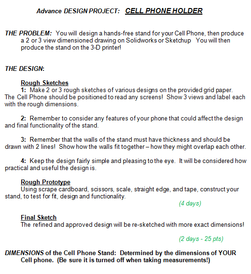
This project has to be one of the most challenging ones I've ever done. This project is called "Cell Phone Holder Design." It's exactly what it sounds like. We had to build a cell phone holder. I really enjoyed this project because we got to use it with our real phones. It also involved a lot of thinking and work, which made this project somewhat challenging.
First off, I had to think of my design. We sketched it on grid paper. Then after that, we had to measure the dimensions of our phone. These dimensions help us determine the dimensions of our cell phone holder. It helped us because it helped us determine whether the holder should be bigger, smaller, or the same size as the phone. After that, our teacher, Mrs. Dunlap, checked out our sketch and allowed us to build a simple design for it. I had made my design out of cardboard. I had a difficult time building that because it didn't go the way I planned. After building the small design for it, we had to create a Google SketchUp for the design. The Google SketchUp consisted of the dimensions of the design and the three views.
First off, I had to think of my design. We sketched it on grid paper. Then after that, we had to measure the dimensions of our phone. These dimensions help us determine the dimensions of our cell phone holder. It helped us because it helped us determine whether the holder should be bigger, smaller, or the same size as the phone. After that, our teacher, Mrs. Dunlap, checked out our sketch and allowed us to build a simple design for it. I had made my design out of cardboard. I had a difficult time building that because it didn't go the way I planned. After building the small design for it, we had to create a Google SketchUp for the design. The Google SketchUp consisted of the dimensions of the design and the three views.
Template

Click for larger image
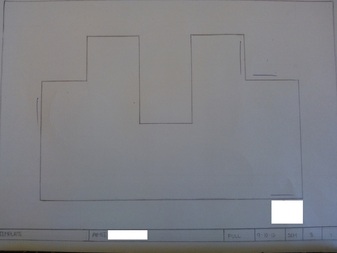
This project was my very first drawing and layout that I drew in drafting. This is just a simple practice drawing. Although there were some mistakes, I learned where to start the layout (border around drawing), and I also learned how to make the drawing itself. We got the directions on how to draw the template from another piece of paper that gave the measurement of the lines. This assignment was similar to when I first started learning how to make my website for computers' class. There were many imperfections, and I didn't know where to begin. But once I started to explore all the different stuff that were available, I got the hang of it, and now it's pretty simple. That's how I first started out in drafting.
To make this template, we used many tools. The one tool that is always required when drawing is the T-square. The T-square allows you to make perfect lines, place your tools in a straight alignment, and it prevents your drawing from moving around. Another thing we also use is tape. Tape is also required because it holds down your drawing when you are erasing. Other things used are a scale, erase brush, different pencils (depends on what you need it for), eraser, and an eraser shield. To start off the drawing, you have to use a 4-H pencil so it's easy to erase when you make mistakes. Then you use a F pencil to darken it. All of these tools make drawing the lines easier.
To make this template, we used many tools. The one tool that is always required when drawing is the T-square. The T-square allows you to make perfect lines, place your tools in a straight alignment, and it prevents your drawing from moving around. Another thing we also use is tape. Tape is also required because it holds down your drawing when you are erasing. Other things used are a scale, erase brush, different pencils (depends on what you need it for), eraser, and an eraser shield. To start off the drawing, you have to use a 4-H pencil so it's easy to erase when you make mistakes. Then you use a F pencil to darken it. All of these tools make drawing the lines easier.
